Validation and the Standing Desk
Validation is an engineering activity. In many ways it’s very much how engineers tell a product, “you’re awesome!”
Unfortunately, many people don’t really understand what engineering validation really is. They think it’s something that happens at the end of all the other work. Often people who don’t understand validation think it’s performed on the finished product. Specifically that it’s only performed on the finished product in the form of “testing.”
Yes, you test the product at the end, but how do you know the product will work when placed into service in the users’ environments? As they intended to use it and as you intended it to be used? In fact, how do you know–when you only test at the end–whether the idea behind how you think the user will use it and how they think they will want to use it are in sync?
Validation takes place much earlier than at the end when the product is tested. Validation can even strongly influence design and construction. When used to validate requirements, design, construction or integration concepts, validation is likely to mitigate the risk of spending expensive engineering and construction hours on a product that might not be as useful or might be over-engineered for the way in which it will be used.
As an engineer I have countless examples of validation at work in the real world. In fact, a few years ago I wrote this blog and video about the Apple iPhone 4 signal interference fiasco where it was found that a known electrical design flaw in the body of the phone was allowed to remain in the product on the claim that “no one will use it that way” only later to be “validated” by the user community. Still, plenty of people don’t understand how validation adds value prior to testing.
For some time I had contemplated using a standing desk but never did anything about it. (A desk that’s up high enough to work while standing.) A back muscle injury taking longer than I’d like to heal got me thinking about the desk again and so I began researching standing desks in earnest. Of course, I also looked at a number of “do it yourself” options that would be aesthetically pleasing, cost-effective and would satisfy my life-hack geekery.
I also looked at the space in which this desk would be placed and realized I would have to find somewhere for my current desk to live. Though not ideal or long-term, a temporary home for the current desk would likely be found in a kid’s room until we’d need to supplement it with a way for more than one kid to work at it at once.
This is when I had the following thought: just raise your current desk! (Note that these mental iterations are full of both design, integration and validation considerations, as well as “verification” which are all subjects for other times.) I turned to envisioning various ways to raise the current desk and settled on an idea that would have occurred to me first had this been presented to me in college: ‘milk crates.’
I would place a pair of milk crates under each of the legs of the desk (which are actually rails/skids and not four classic legs) and they would simply raise the entire desk. I wouldn’t need to reconfigure the desk in any other way. Everything on the desk–as well as how I use it–could remain as is. What more could I ask for? As long as the milk crates would raise the desk enough for me to stand at it and use it comfortably, I’d be all set.
So I researched the sizes and styles of milk crates, compared these dimensions to the desk and verified that raising the desk by the height or depth of a milk crate would be sufficient for me. I selected inexpensive milk crates from the national department store chain with the bulls-eye logo.
Due to the particular construction of my desk (note earlier comment about non-classic legs) as well as the lower structural strength of the lesser expensive crates, I decided that placing wood boards on the crates and placing the desk onto the boards would provide better strength, durability, and stability to the whole “towering” assembly. BONUS! I happened to have bookshelf boards left over from a bookcase we had dismantled and disposed of long ago. After moving within our first home from basement to top floor then moving with us again to two homes these “assemble-at-home” shelving units just couldn’t handle the stress and their exoskeletons gave up their respective ghosts. But their shelves were perfectly in-tact and strong. In other words, perfect for their next role as planks for my desk to stand on.
Milk crates and boards strategically placed by the sides of my desk, I was ready to have my wife help me heave the desk into the air as we enlist one of our kids to slide the board-topped crates into place underneath.
But, one last check.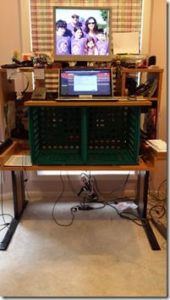
I’d really hate for the whole affair to go down only to find that the height wouldn’t actually be enough. Yes I verified the dimensions, and yes, I verified that the design was logical, and I had even placed the board on a pair of crates and stood on them to ensure that the crates we bought were as structurally sound as they were expected to be. But really, how hard could it be to simulate the new height of the desk? Not hard at all. All I need would be to place a milk crate *on* the desk and see whether the added height would meet my needs.
And that’s when it happened.
Not only would the added height meet my needs but this simple validation action resulted in a complete redesign of my idea that is not only easier to carry out, but I can also easily undo it if we want. In fact, this validation activity resulted in a design that uses less material, requires less (almost no) lifting and even adds usable space to my desk.
Instead of putting the desk on four milk crates and two boards I put two milk crates on my desk! With the open end of the crates facing forward and one board across the two crates, my laptop, mouse and phone now sit on the board, and the space beneath is available for stuff. The only adjustment required was to move the second monitor to the top of the hutch (which I wasn’t using productively anyway).
The space behind the crates is still accessible and now has a bunch of the stuff I barely touched–from previously on top of the hutch.
Among the many unexpected benefits of this validation one was much more profoundly unexpected. Had anyone suggested putting crates on top of my desk instead of underneath? Before I saw what it looked like when I actually did it, the idea would likely have been rejected on the face of it. (Superficially, it is not as pleasing to the eye.)
This is why we do validation.
Had I waited to “test” my newly heightened desk after it was up on crates, I would have certainly been pleased with the results. My desk would be as it always was–only higher–and it would be at a good height and entirely usable. It would have consumed the resources allocated to it and been on budget. Instead, the validation gave me an even more functional product, for half the resources and budget and perhaps 20% of the expected manual effort.
Or… you can just keep waiting for “testing” to do your validation.
Comments (2)
Steven Swanson
Good example of applying validation logic to a real world problem, thanks for sharing! In the vein of validation, before committing substantial resources towards a wall mounted adjustable height desk I’ve prototyped, I’m gauging market response with a pre-kickstarter site. Check it out and I’d love your input! http://www.spacecraft.la
Cheers!
Derek Huether
This blog post inspired me and now I have converted my standard desk into a standing desk. I may have to invest in some better shoes now. Standing can be a real workout!